
Bulk actions
Tips, Tricks & Best PracticesHandbookSave time by editing projects, time entries and tags in groups.Friday arrives and you’re at the end of a week where nothing has gone right. The bathtub has overflowed, your coffee order has been made wrong more than once and you’ve logged all your hard-worked hours under the wrong project with the wrong tags. Visions of precious weekend hours spent transferring each logged hour individually to the correct project and updating tags flash before your eyes.
Not for long. Bulk actions in Timely mean that you can update those projects and tags quickly and easily, leaving the bathtub and coffee as your only concerns heading into the weekend.
Bulk updating tags
The way you gather entries you want to edit in Timely will depend on the way they’re grouped. You’ll also have the option of pulling this information from an individual project’s “Timesheet” tab or from within the Reports tab in Timely.
There is an “untagged” preset within your filters which lets you search for all untagged entries. If you need to narrow things down, you can also search for entries against these Timely properties:
- Clients & Projects
- Users
- Teams
- Tags
- Projects Only
- Clients Only
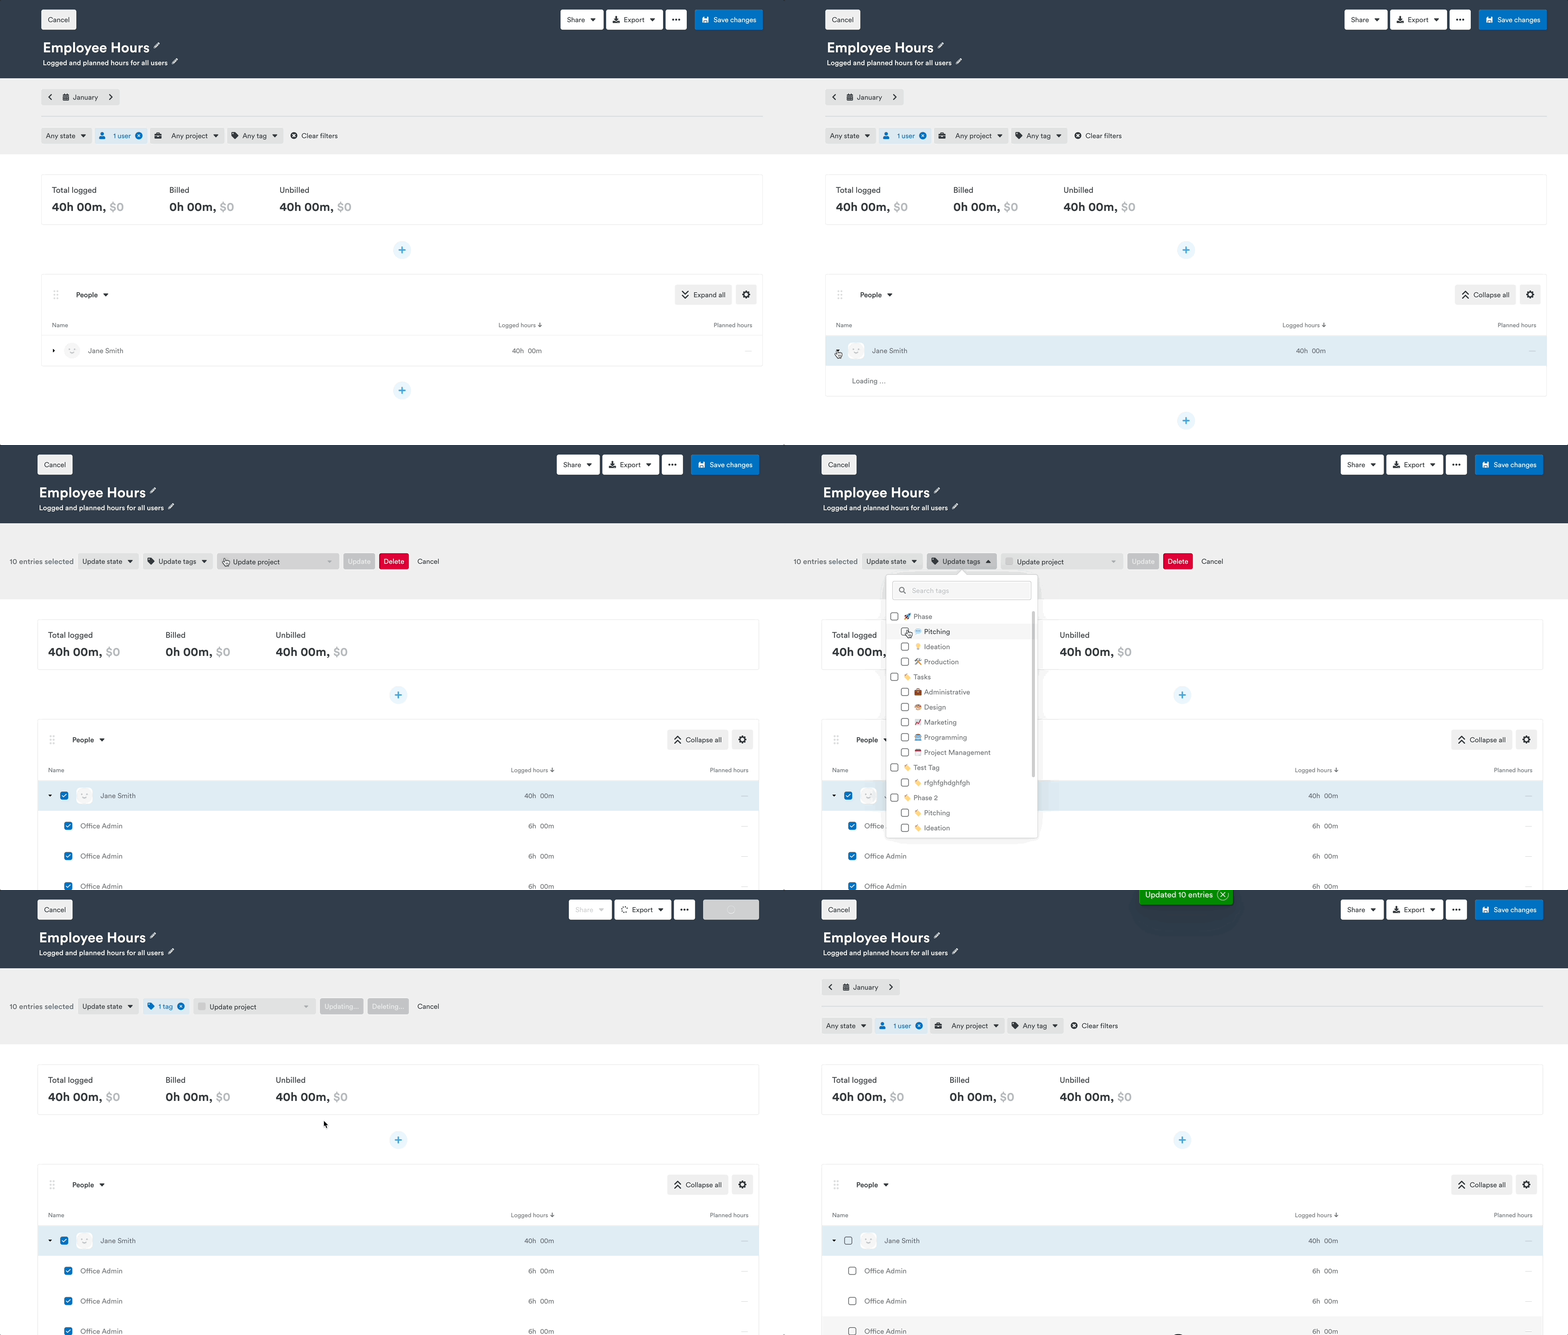
You can either click on entries individually or filter by user, project or tag name to select a group of entries. Once the necessary entries have been selected in your report, click the “Update tags” button, search for the tag that needs to be added and click the “Update” button to finish. This will replace all selected entries with the new tags; any existing tags on the entries will be replaced.
Here’s how that looks in action:
Bulk updating time entry states
Within Timely there are a few default time states such as “Billed” or “Logged” as well “Locked” or “Unlocked”. The “Logged” status is default and indicates the entry in question has not had any other status applied.
For those on a Premium or Unlimited subscription plan, you also have the ability to create and define your own custom time entry states.
Need to go through and update a slate of time entries from one time entry state to another? No problem!
Bulk assigning the “Locked” time entry state
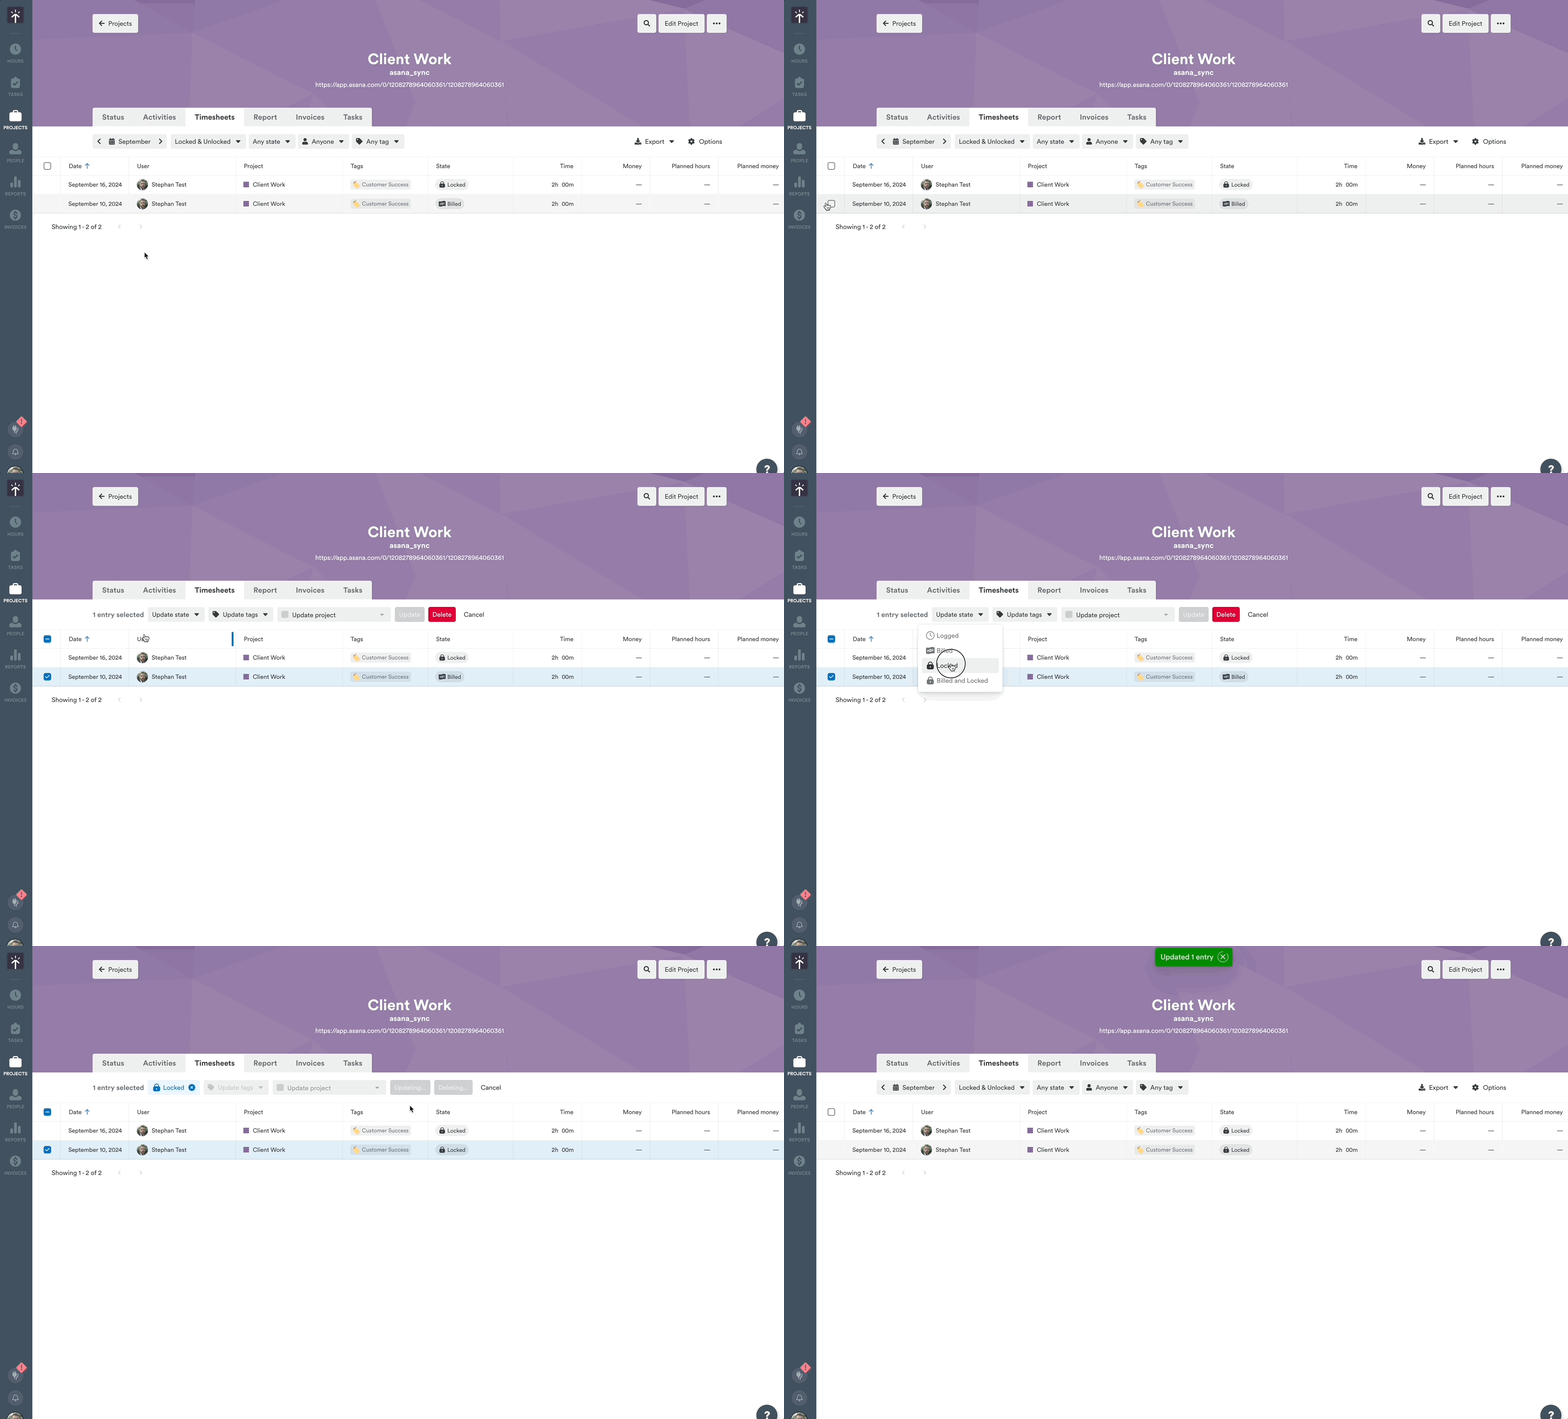
If you need to make sure hours don’t get updated without changing their status as “Billed” or “Logged”, you can assign the “Locked” entry state to time entries preventing further changes.
From the Timesheet tab in Projects, individual user Pages or Reports, or on an individual user’s timeline, select individual or hours in bulk then update the state to “Locked”, or whichever custom state you’ve configured with the locked attribute.
Bulk assigning the “Billed” time entry state
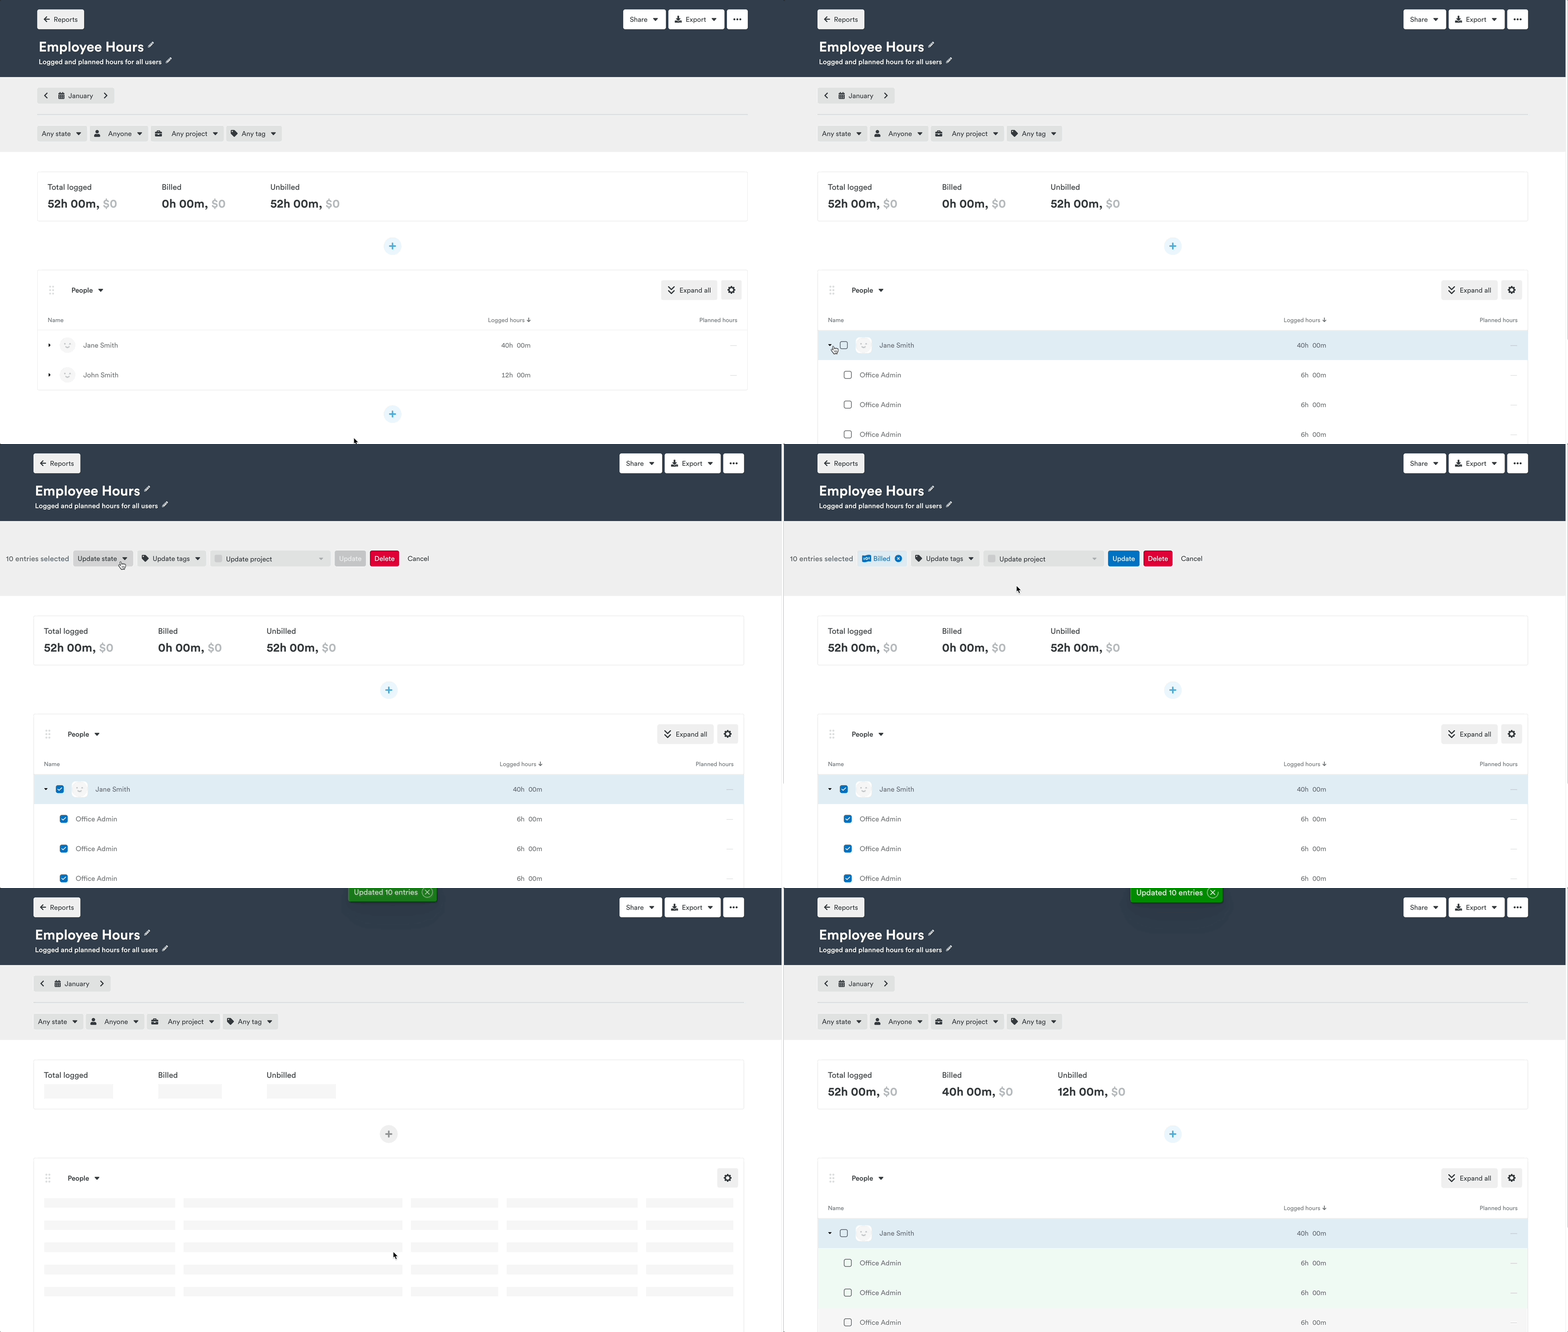
If you need to update the status of hours as either “Billed” or “Logged”, you can use the same steps to group your entries. Either narrow them down using the various filter options. If you are on a Starter subscription plan, you’ll see the options to show “Billed” or “Logged” entries specifically; those on Premium or Unlimited will see a dropdown to select and filter more broadly by entry state.
From there, click either “Billed” or “Logged” to make your changes, then click “Update” to finish:
Bulk updating projects
You can move hours in bulk from one project to another either from an individual project page or from within Timely’s Reports tab.
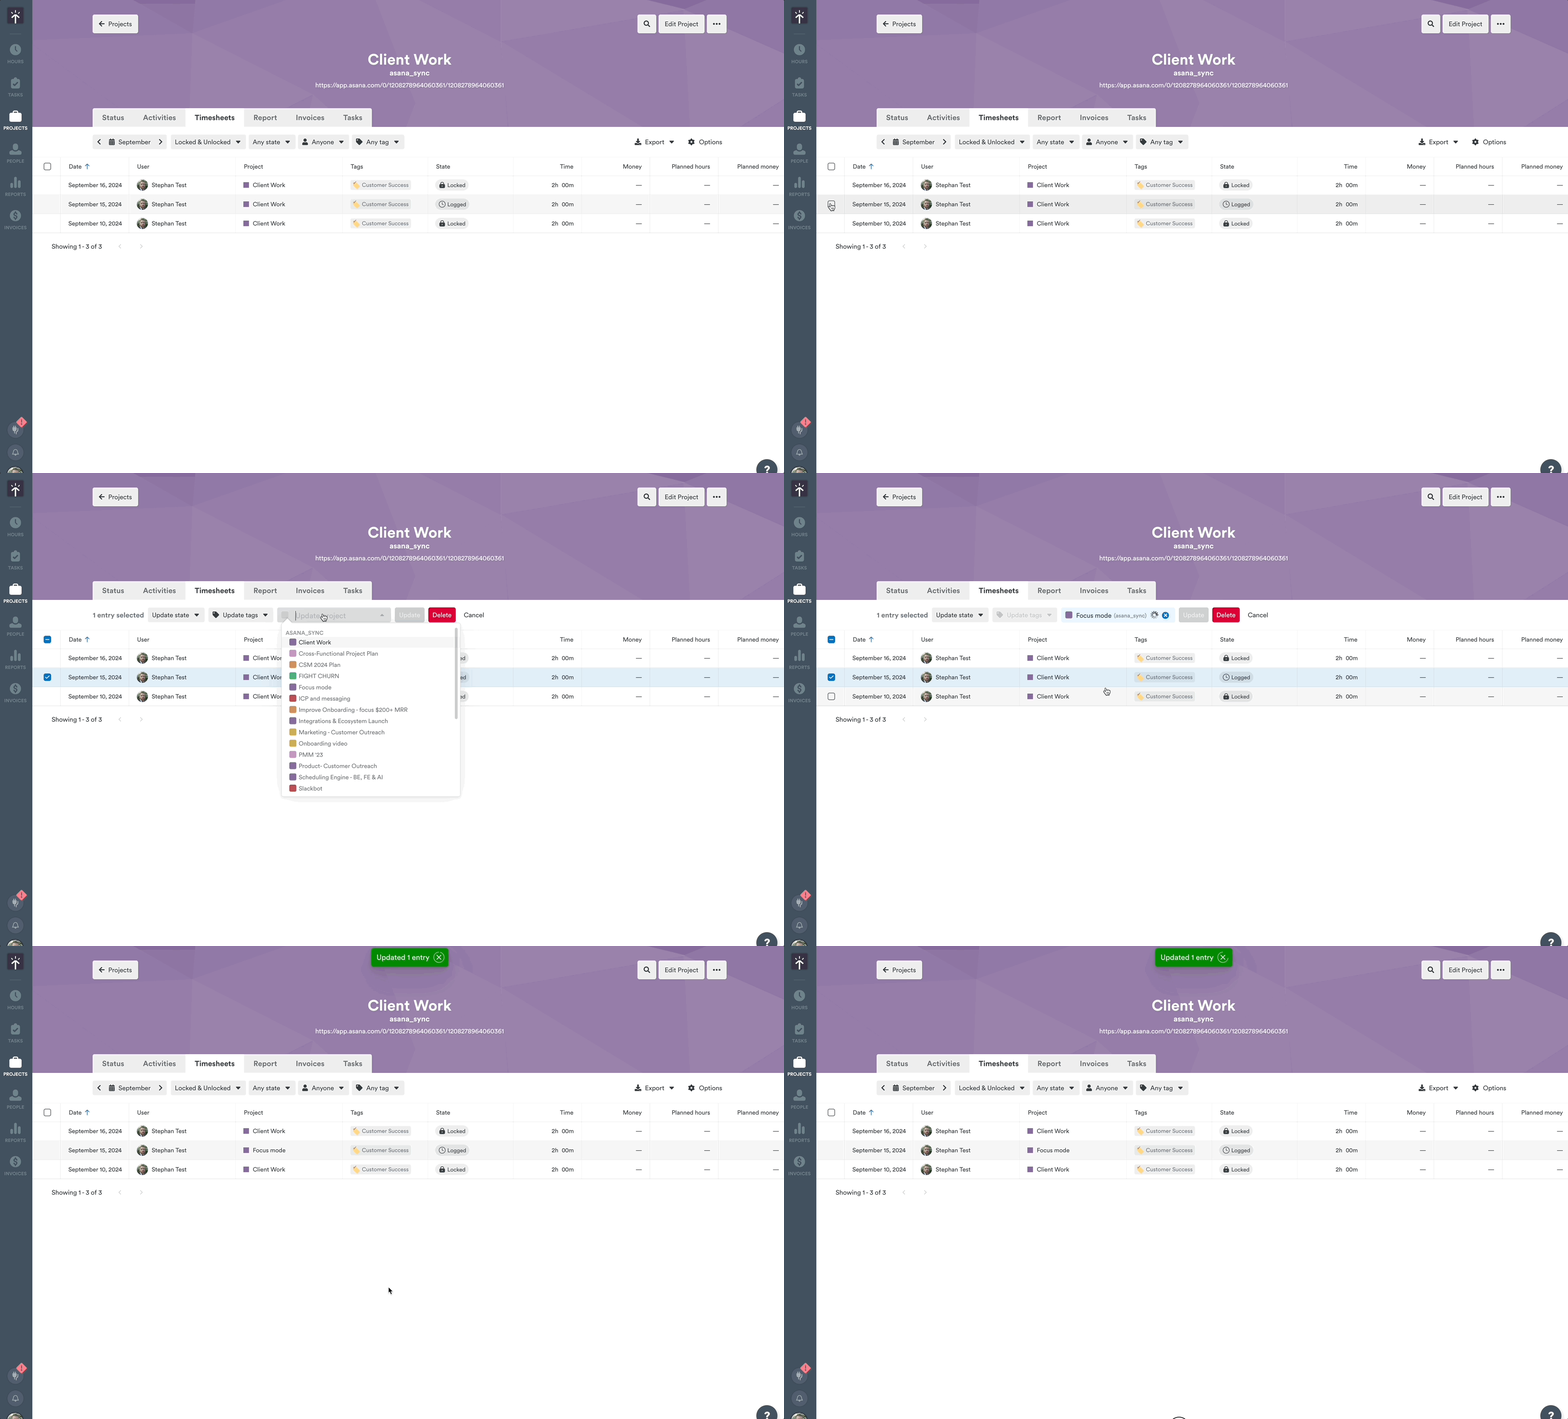
From within an individual project, first click the “Timesheets” tab and filter for the user for whom you’ll be moving the hours. Either use the checkbox at the top of the chart to select all hours or check off the individual entries you want to update. Once you have all the hours you need to move selected, click “Update Project” and choose the destination for these hours, then click “Update” to make the change:
Managers and Admins can also bulk-update the project for entries belonging to multiple users at the same time — no need to repeat the process user by user.
Who can bulk-update which entries
Bulk updates follow the same permission rules as updating a single time entry. In practice this means:
- All users can bulk-update their own hours, including in projects they are not a member of.
- Users with project update access can bulk-update hours in the projects they belong to.
- Team leads (both employee-level and manager-level) can bulk-update hours belonging to their team members, even in projects the team lead is not personally a member of.
- Custom roles with global user read access can bulk-update hours across all users in the workspace.
Handling users who aren’t members of the target project
When you bulk-reassign entries to a project and one or more of the selected users isn’t yet a member of that project, Timely will pause and ask how you’d like to proceed:
- Add to project — the affected users are automatically added to the target project at their default hourly rate, and all selected entries are moved.
- Skip entries — only entries belonging to users who are already members of the target project are moved; entries for non-members are left unchanged.
Handling a billable mismatch at the same time
If the target project’s billable setting differs from the current entries and some users aren’t members yet, both questions are combined into a single popover. You’ll see a section for the membership choice (Add to project / Skip entries) and a section for the billable choice side by side. Click Apply to confirm both decisions at once, or Cancel to go back. If you close the popover without applying, both choices reset to their defaults the next time it opens.
Undoing a bulk project change
After a successful bulk project change, a toast notification appears at the bottom of the screen with an Undo button. You have 10 seconds to click Undo. Doing so:
- Restores all moved entries to their original project.
- Removes any users who were just added to the target project as part of an “Add to project” action, fully reversing the membership change.
It should also be noted that when moving hours in bulk between projects, any Tags assigned to those hours must be assigned to both projects.
If you know that a number of hours have been logged to the wrong project over a period of time, you can also create a custom report in Timely to filter for those specifically by date.
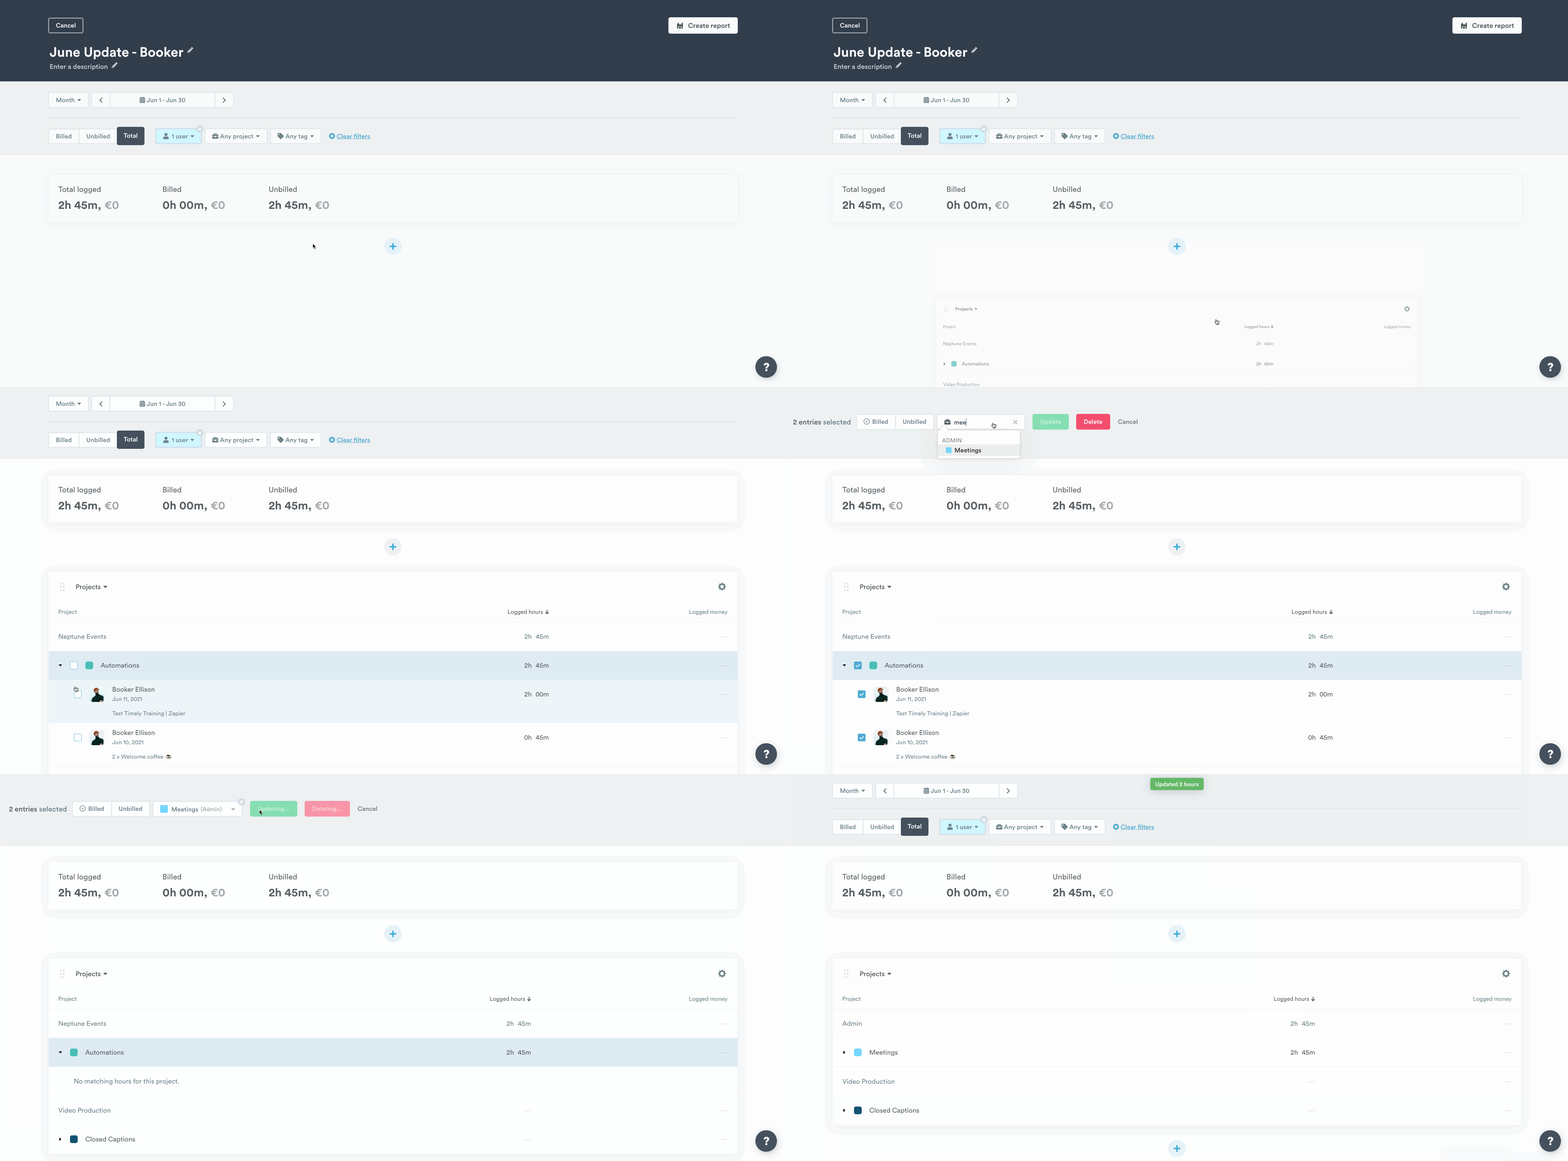
With your filters set up, add a new Projects widget to the report as a table. From there, use the checkbox at the top of the table or select individual entries then click “Update Project” to find a new home for these entries and click “Update” to send them on their way:
Bulk reassigning projects to another client
Admins and Managers can move multiple projects to a different client in one go directly from the All Projects view.
- Go to the Projects page and open the All Projects tab.
- Select the projects you want to reassign by ticking their checkboxes. A batch actions bar will appear at the bottom of the screen.
- In the batch actions bar, click the Update client picker and choose the destination client from the dropdown.
- Click Update — the button stays disabled until a client is selected.
- A confirmation modal will appear asking “Are you sure you want to update client?” — confirm to apply the change.
- A success toast reading “Updated X projects — Undo” will appear with a 10-second countdown. Click Undo within that window to revert all the moved projects back to their original clients.
Bulk updating time entries from the Hours Dashboard
Timely has rolled out a number of enhancements and improvements directly to your timeline with the goal of making your life easier than ever.
Copying or moving multiple time entries to another day or days
Need to select ALL the time entries for an entire day? Click the selector checkbox that appears next to that day on your timeline.
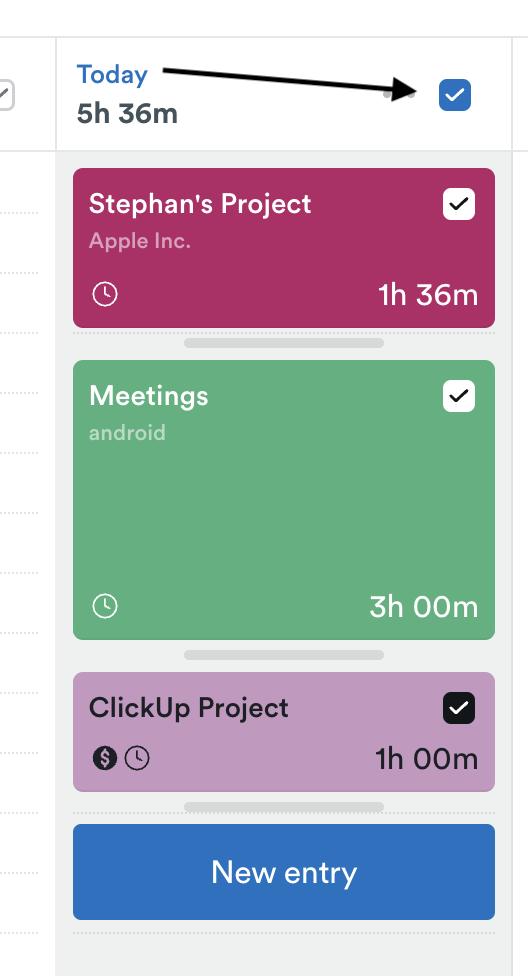
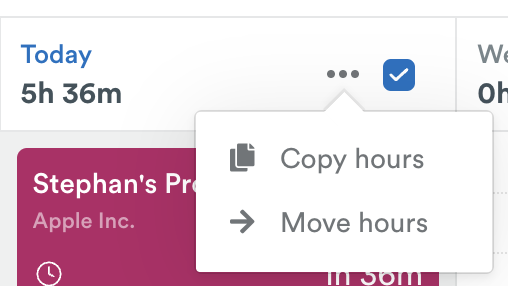
You’ll also see the option to bulk copy ALL the hours from that day to another day or days of your choosing. Alongside this, you can choose to move those same hours to another day if needed as well.
Bulk updating a time entry’s assigned Project
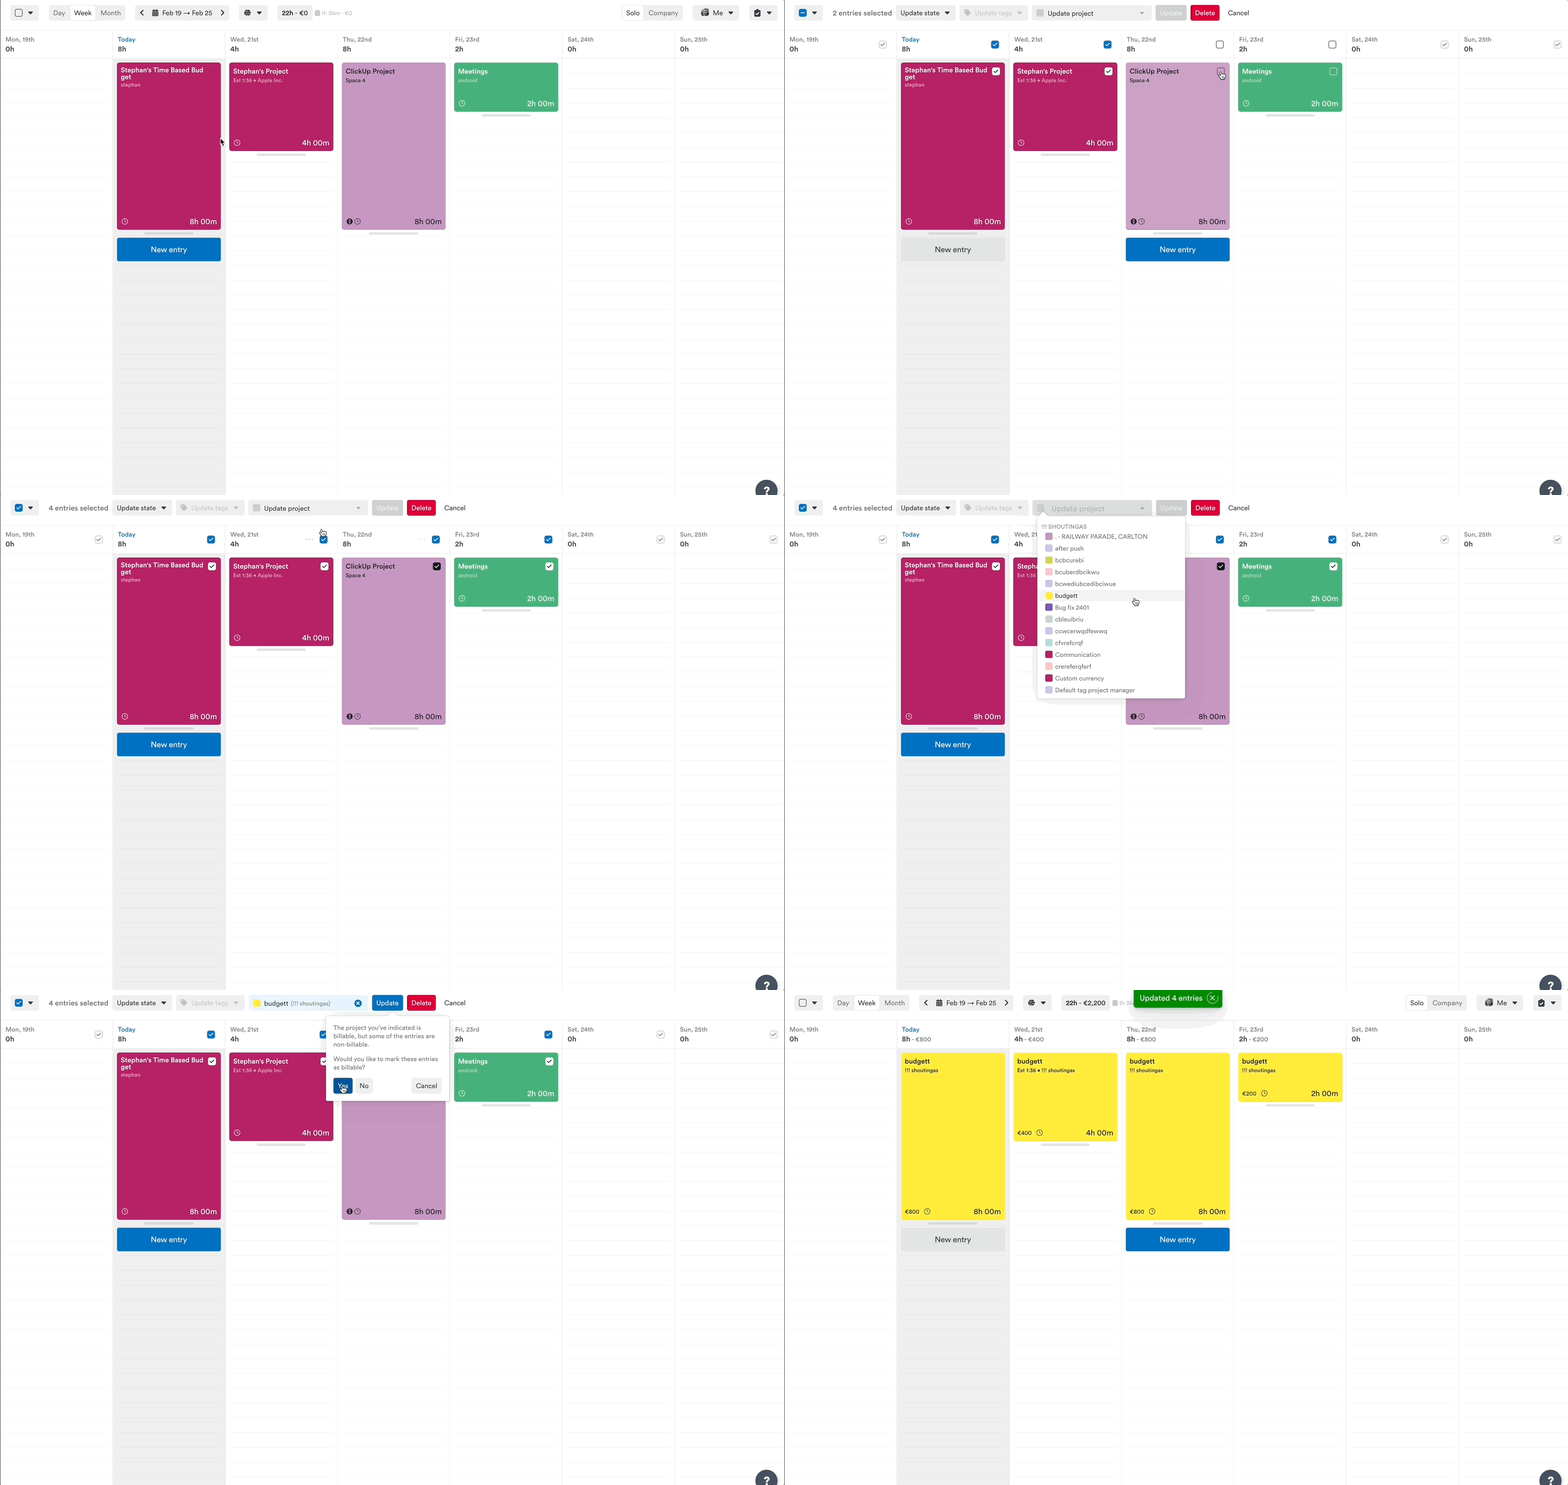
From the Hours Dashboard, you can now select the specific time entries in bulk that you’d like to re-assign to another project. Simply click the selector box that appears when hovering over these entries and then select a new project from the “Update project” dropdown, before clicking “Update” to confirm.
Bulk updating a time entry’s assigned Tags
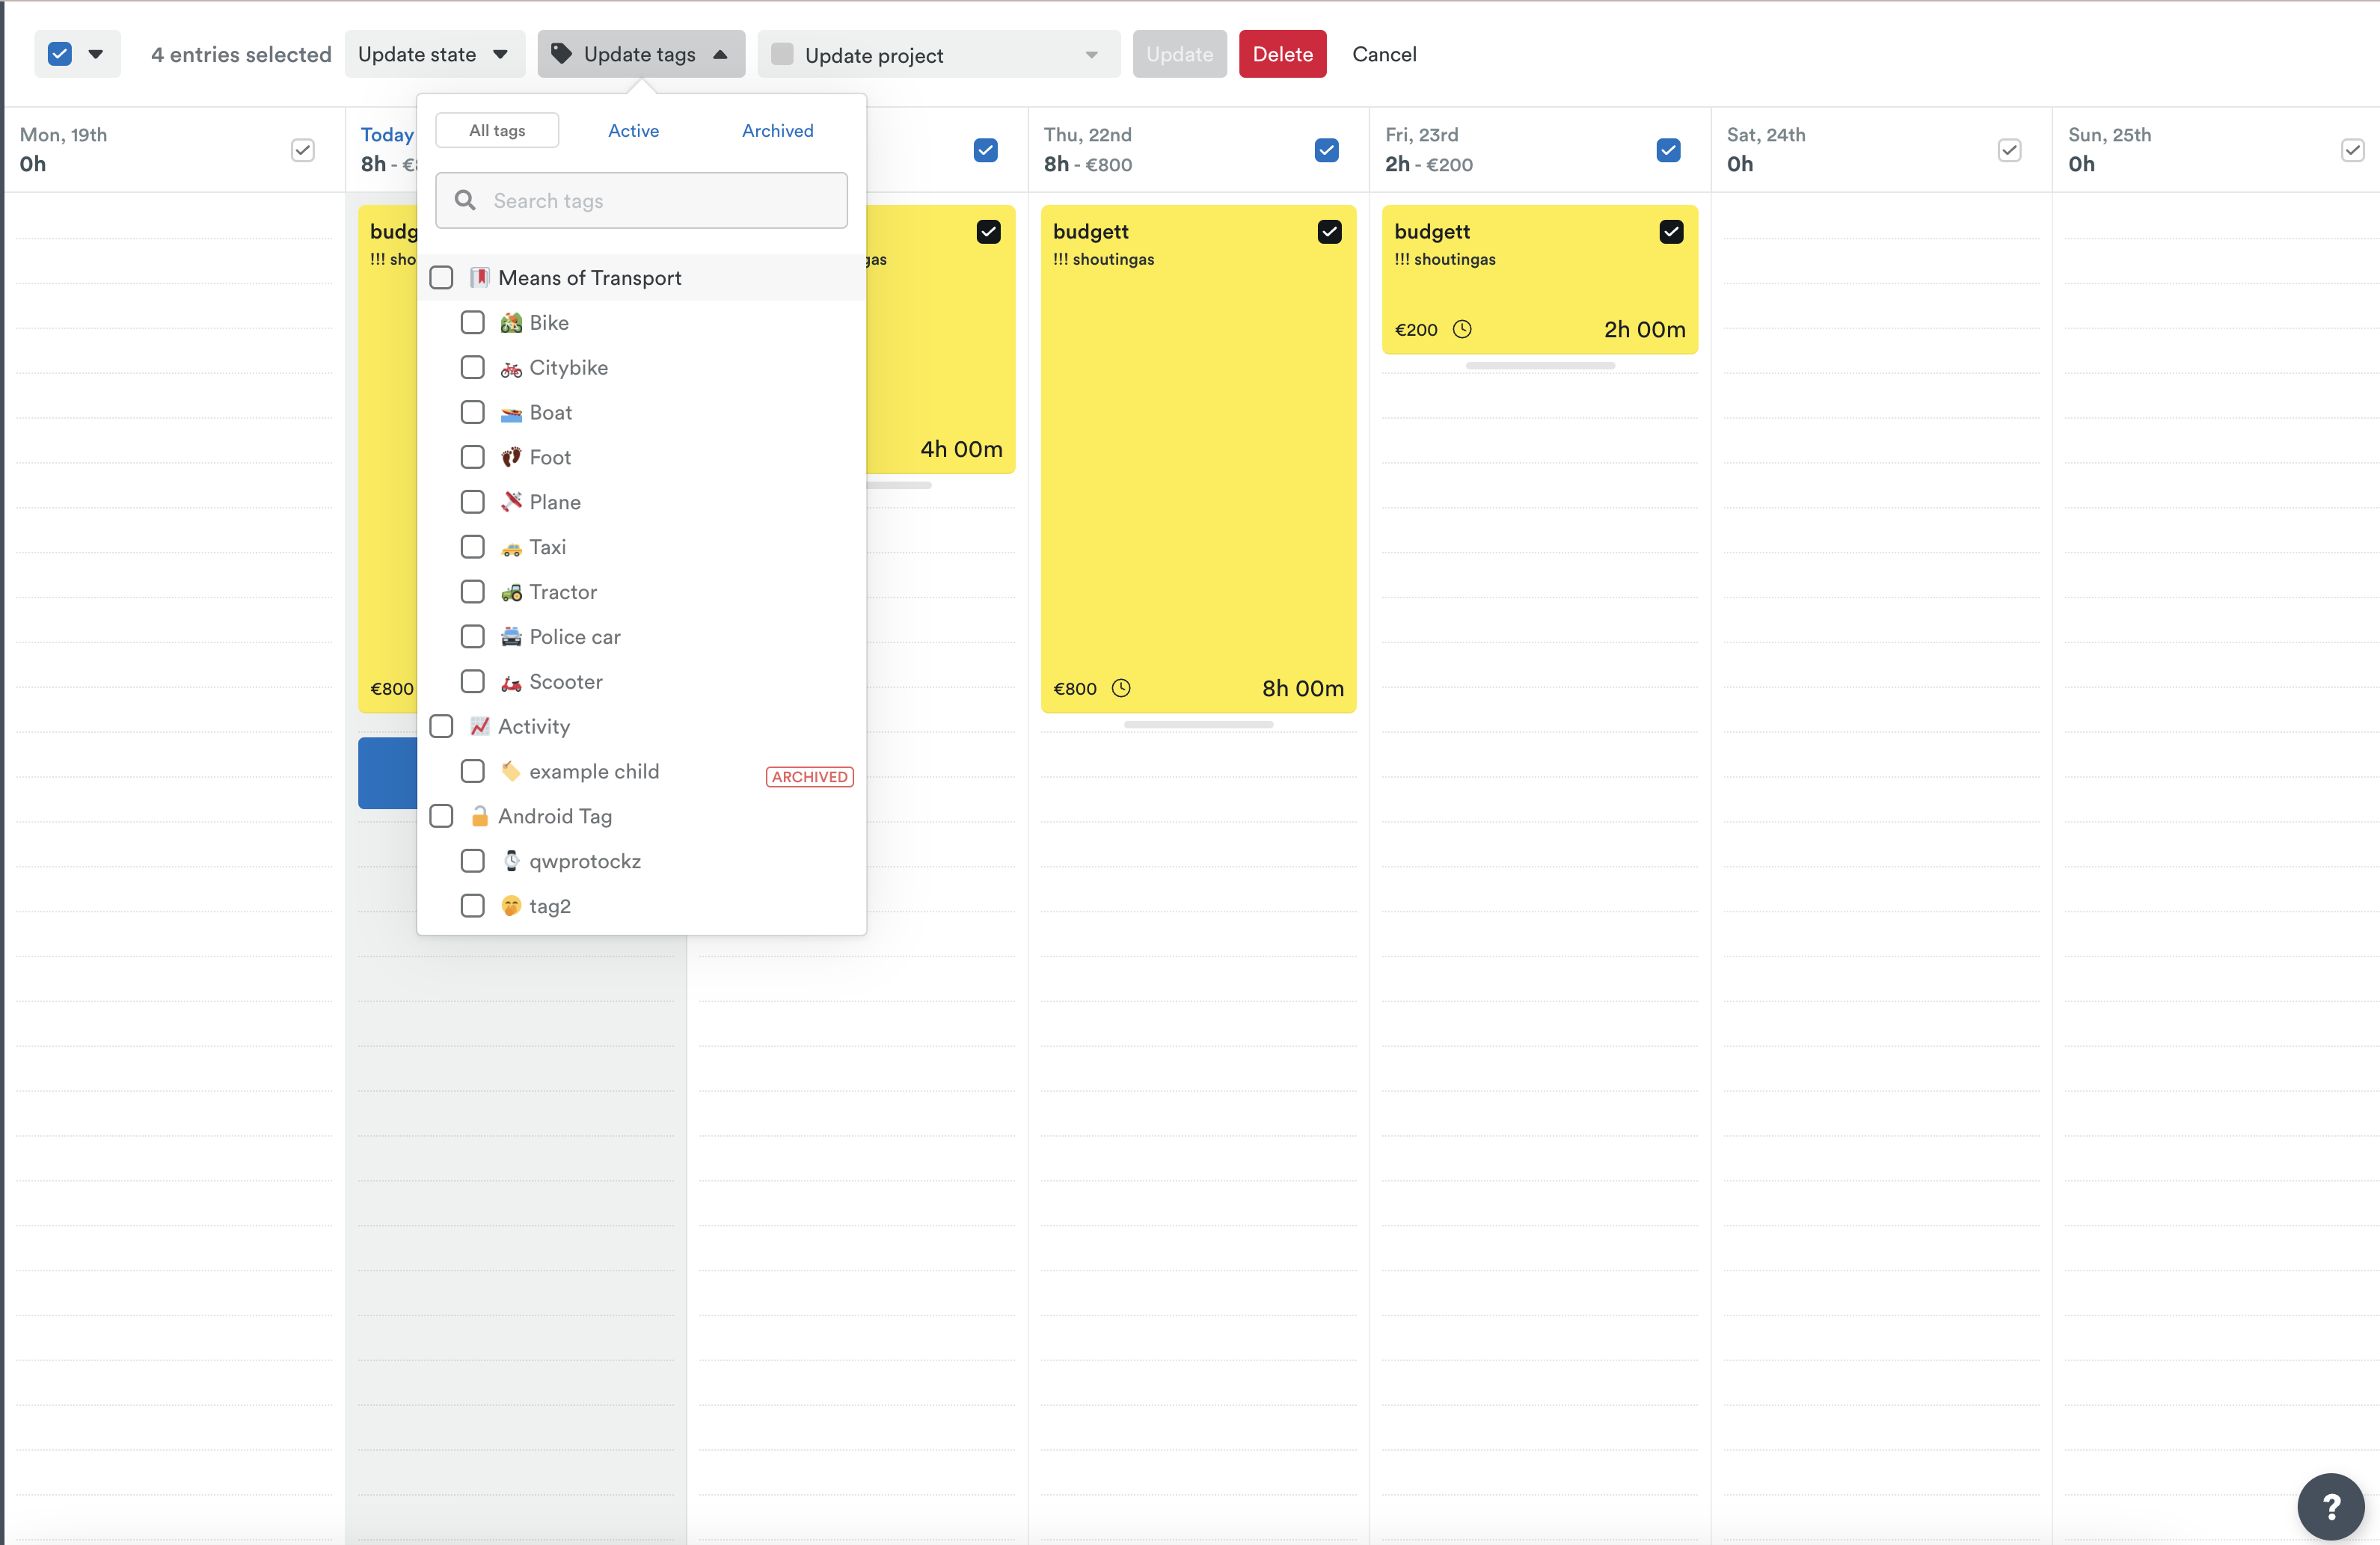
Similarly to updating the project for a time entry, you can also select the appropriate Tags for multiple entries in just a few clicks. Select the appropriate time entries by clicking the selector box that appears when hovering over, select the needed Tags from the “Update tags” dropdown (you can select as many as you’d like), and then finalize by clicking “Update”.
Bulk updating a time entry’s time state
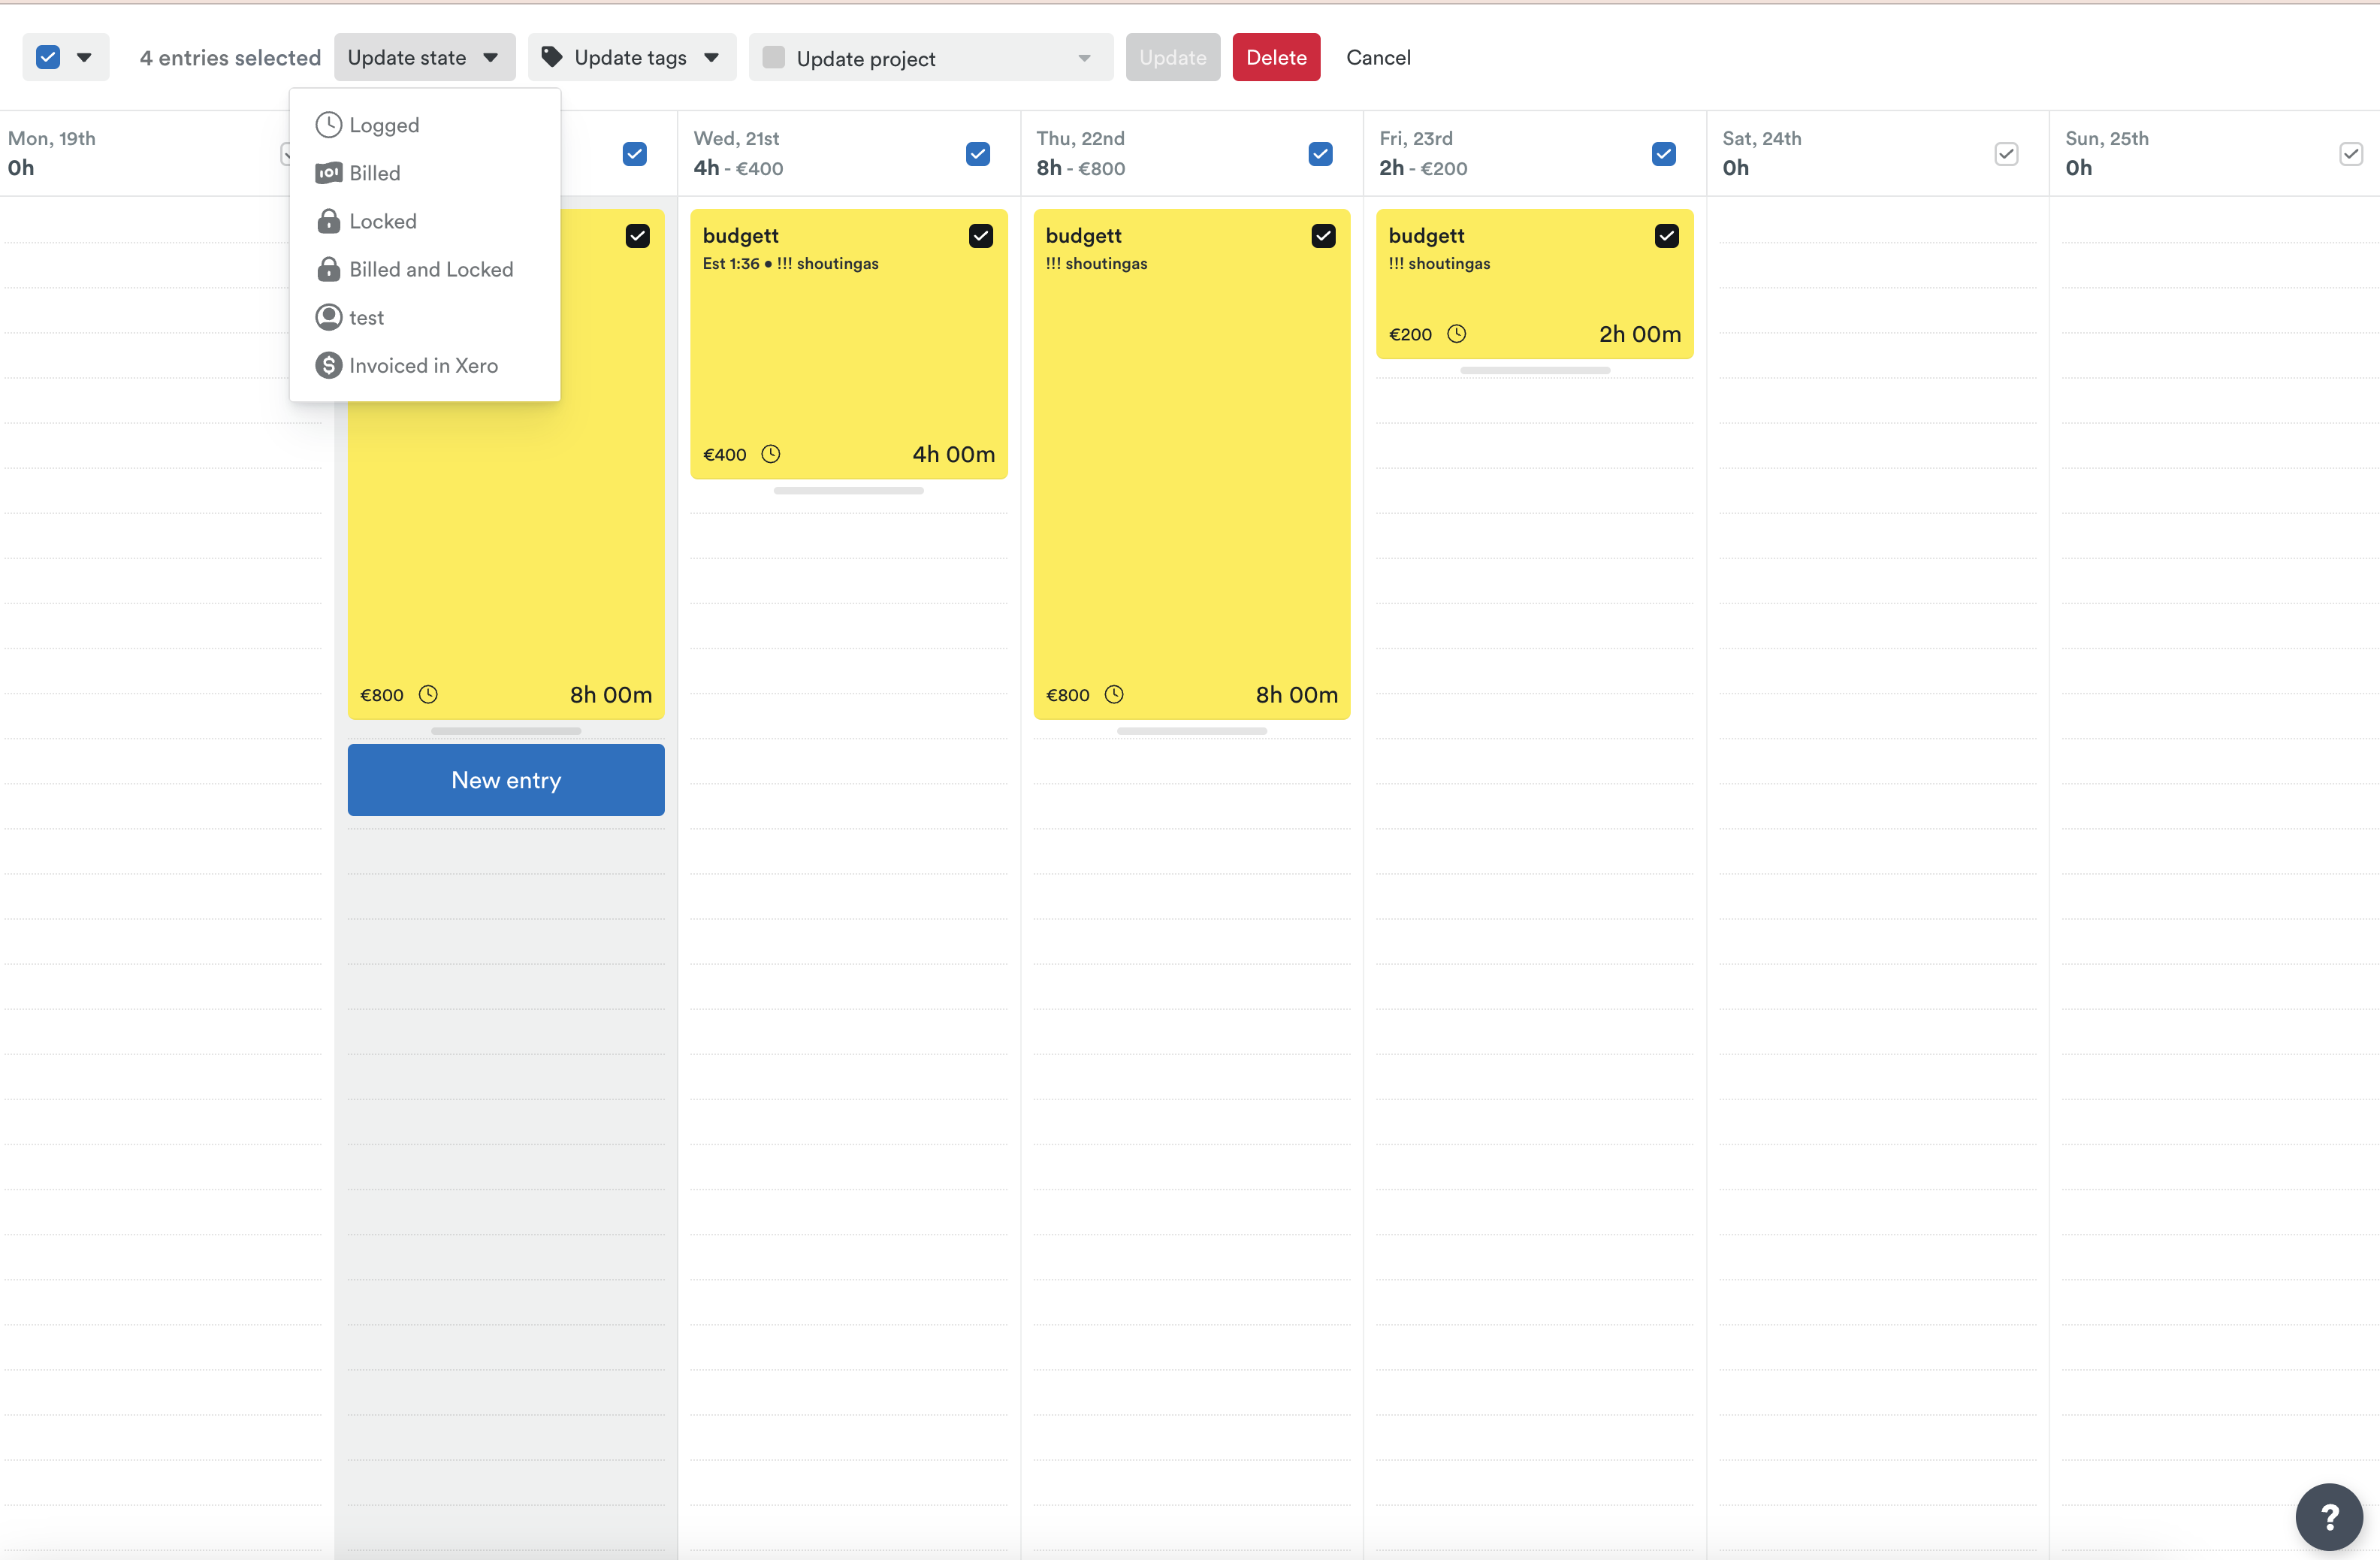
The final bulk update option available in the Hours Dashboard is entry state. Need to lock a few entries after billing? Prefer to process and mark down payroll when viewing Hours directly? No problem!
Similar to the other update options, you’ll want to hover over the time entries in question, click the selector box that appears when hovering, then select the new time entry state from the “Update state” dropdown before clicking “Update” to finalize.
Deleting time entries
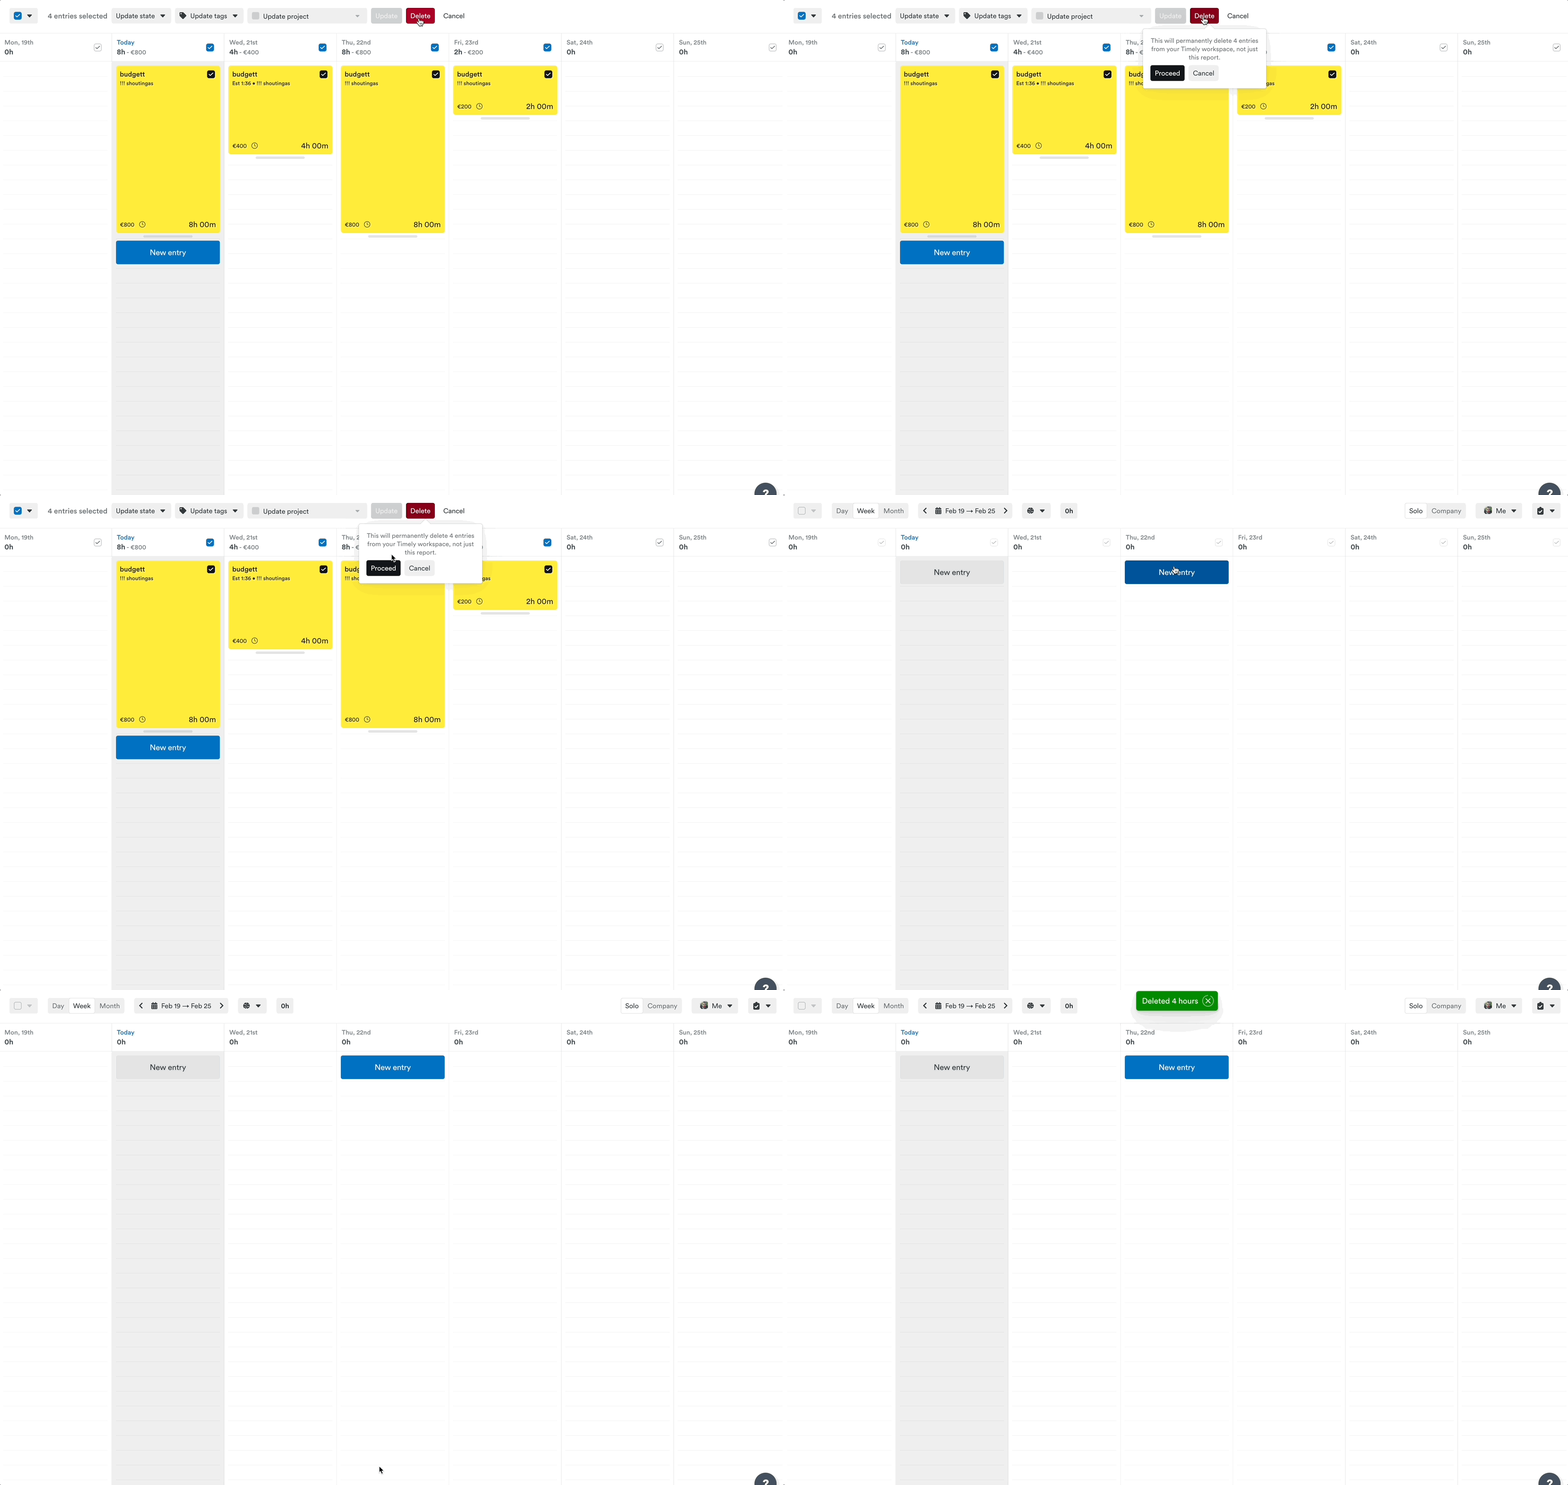
Mistakes can happen to the best of us! If you need to bulk delete time entries we’ve got you covered. From the Hours Dashboard, simply hover over the time entries in question and click the selector box that appears. Once you’ve selected all your time entries, click the “Delete” button, and click “Proceed” to confirm.
Last updated July 13, 2026
Have feedback for this article or need more help? Contact us now.